Adding staff and permissions
Give each helper only the access they need: a door volunteer can scan tickets without being able to change prices, and a box office cashier can sell at the door without being able to edit events.
Where to find it: you add people in your organization's BoosterConsensus admin panel at boosterconsensus.web.app, not inside Ticketing by BoosterConsensus. Sign in there with the same email and password you use for Booster Tickets.
Who can use this: your organization's club admin (the account created at sign-up). Your email address must be verified first.
Tip: For a one-night door volunteer, you may not need to create a login at all. A personal phone scanner lets anyone scan tickets by scanning a QR code you show them. It expires on its own.
The three ticketing permissions
| Permission | What it unlocks in Ticketing by BoosterConsensus |
|---|---|
| Manage Ticketing (Studio) | Events, Orders, Venues, Seat Maps, Waitlist, Reports, Gates & Registers, Payments, and Add-ons. Also includes scanning, check-in, and the box office |
| Scan Tickets / Check-in | Scanner and Check-in tabs |
| Run Box Office | Box Office tab (door sales, Stand mode, Orders lookup, and the cash drawer) |
Scanning and box office are separate: one volunteer can have either one, or both.
Your admin panel
The first time you sign in to BoosterConsensus, you'll be asked to accept its end-user terms before the admin panel opens.
- Ticketing-only organizations see a streamlined dashboard with a Getting started checklist, Ticketing Tools (Open Booster Ticketing and Ticket Sales Link), Payments, Organization & Team (Organization Profile, Sign-In Link, Create User, and Staff Permissions), Account & License, and Grow with BoosterConsensus.
- Full BoosterConsensus clubs see the complete club admin panel (Club Operations with Open Booster Ticketing and Ticket Sales Link, plus Governance & Permissions with Create User, Board Permissions, and Staff Permissions).
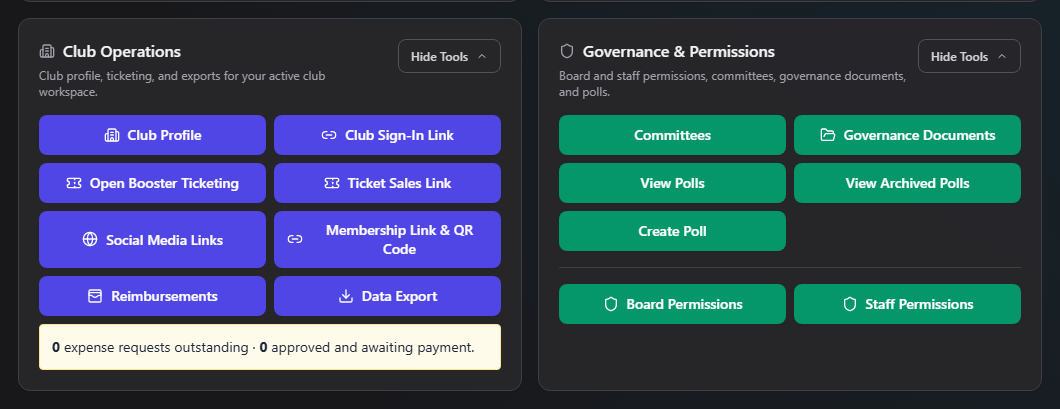
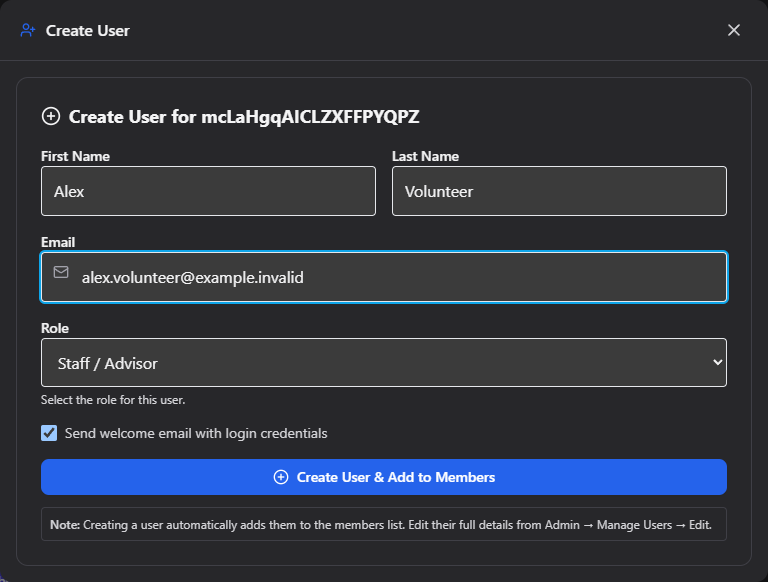
Step 1: Create the volunteer's login
- In the admin panel, under Organization & Team (or Governance & Permissions on a full BoosterConsensus club), click Create User.
- Enter the volunteer's First Name, Last Name, and Email.
- Set Role to Staff / Advisor for volunteers and helpers (or Board Member for officers on a full BoosterConsensus club).
- Leave Send welcome email with login credentials ticked so they get their sign-in details.
- Click Create User & Add to Members.
Step 2: Grant ticketing permissions
- Under Organization & Team (or Governance & Permissions), click Staff Permissions (or Board Permissions for board members).
- Find the person, then tick the ticketing permissions they need: Manage Ticketing (Studio), Scan Tickets / Check-in, and/or Run Box Office.
- Click Save Permissions.
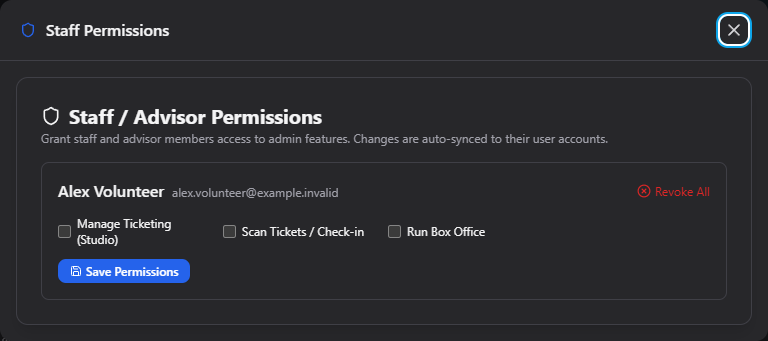
The volunteer can now sign in at Ticketing by BoosterConsensus and will see only the tabs their permissions allow.
For a ticketing-only organization, the list shows just the three ticketing permissions.
Common questions
How do I take access away? Open Staff Permissions (or Board Permissions), untick the ticketing permissions, and click Save Permissions. Revoke All removes every permission for that person.
Can a volunteer scan without an account? Yes. Use a personal phone scanner. Those volunteers can only scan tickets in; they can't sell, refund, or change anything.
Troubleshooting
| If you see... | It means... | Do this |
|---|---|---|
| Creating a user fails with a message about verifying your email | Your own email address isn't verified yet | Click the verification link in your welcome email, sign out, sign back in, and try again |
| The person isn't listed in Staff Permissions | Their role isn't Staff / Advisor | Check the role you chose in Create User. Board members are listed under Board Permissions |
| The volunteer sees "No ticketing access found" | No ticketing permission was saved | Tick at least one ticketing permission and click Save Permissions |
Related
- Signing in: what volunteers see when they sign in
- Personal phone scanners: door scanning with no account