Seat map editor
The seat map editor is where you draw your venue's seating: blocks of rows, a stage, tables, general admission areas, and accessible seating. Buyers see the finished map when they pick seats.
Where to find it: Venues tab → select a venue → select a seat map → Edit seats on a draft revision
Who can use this: anyone with Manage Ticketing (Studio), on a tablet or larger screen
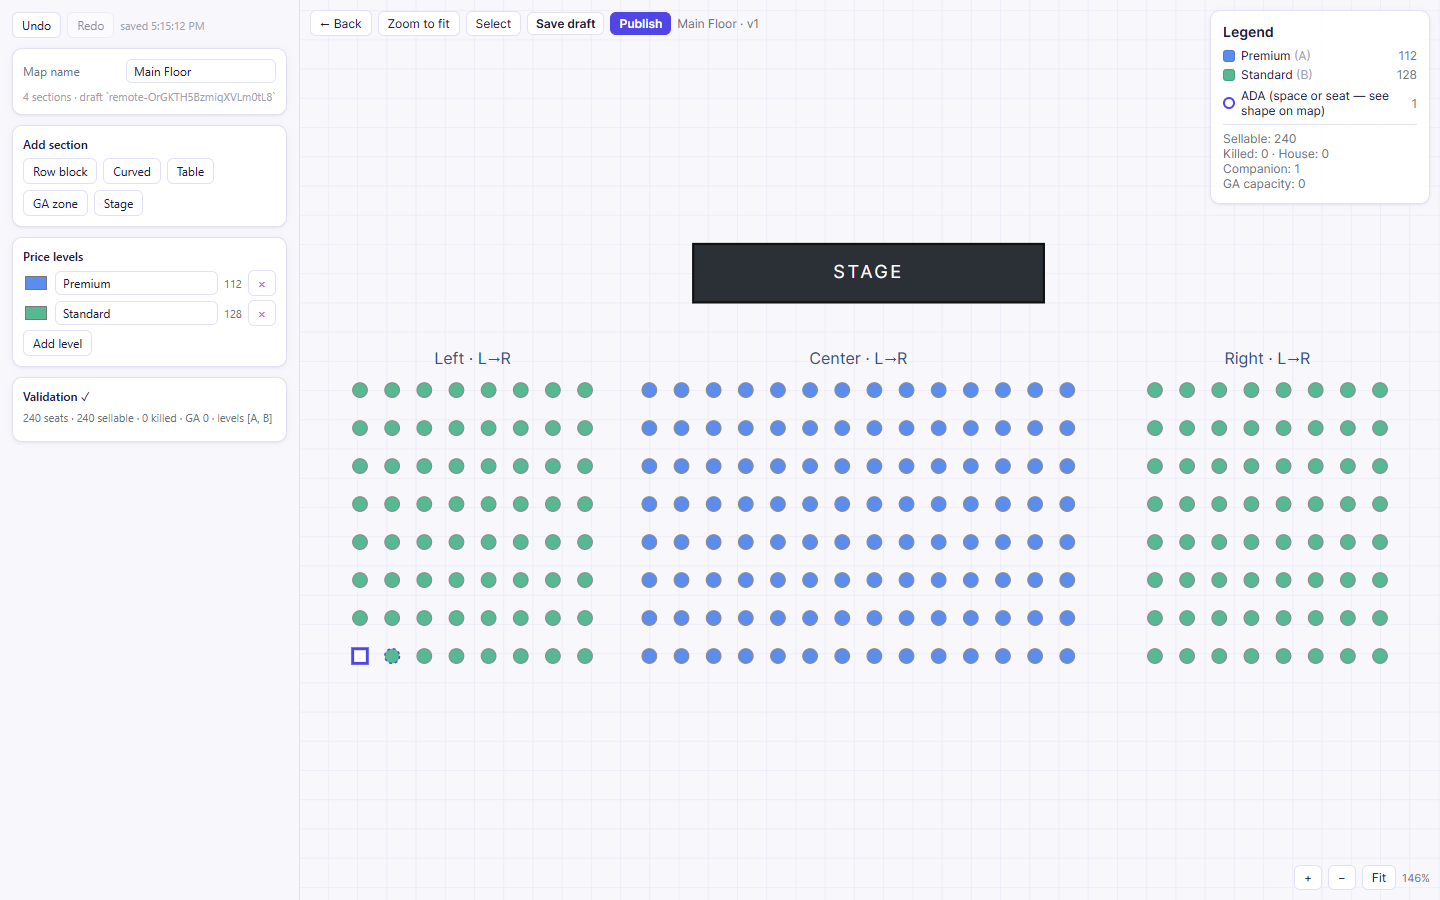
The screen
- Left panel: map name, Add section, Price levels, settings for whatever is selected, and Validation.
- Canvas (middle): your layout. Use +, −, and Fit at the bottom right to zoom.
- Legend (top right): seat counts per price level, plus accessible, killed, and house seat counts.
- Top bar: ← Back, Zoom to fit, Select, Save draft, and Publish, plus an unsaved changes / saved badge.
If you click ← Back (or close the browser tab) with unsaved edits, the editor warns you ("You have unsaved changes. Leave without saving them?") so you don't lose work by accident. If your browser closed before you could save, reopening the map offers to Restore them or Discard.
Edit details on a published map
When you open a published map with Edit details from the Venues tab, the editor opens in a safe in-place mode:
- You can rename sections, relabel rows, choose where row labels appear, reposition or rotate sections and rows, and add or resize stage markers.
- Controls that add or remove seats or change seat types/price levels are hidden, so events already using the map stay valid.
- Clicking Save changes runs a dry-run check first and warns you if any already-sold or held seats would be relabelled (those buyers keep the seat label printed on their ticket).
Build a layout
Name the map in Map name.
Set up price levels. New maps start with Level A, B, and C. Rename them (for example "Premium" and "Standard"), change a colour with the swatch, remove extras with ×, or click Add level.
Add sections with the buttons under Add section:
- Row block: straight rows of seats.
- Curved: rows that arc around a stage.
- Table: seats around a table.
- GA zone: a standing or open area with a capacity instead of seats.
- Stage: a label for where the performance happens. It isn't sold.
Each new section appears to the right of the others, so nothing overlaps.
Adjust the selected section in the left panel: Name, Rows, Seats/row, Seat gap, Row gap, and Price level (the key, like
A). For Curved sections, rows follow concentric arcs around the stage (Radius, Arc°, and Shrink/row), and you can flip the curve toward or away from the stage.Position it: drag it on the canvas, or use the Move section arrows (hold Shift to move 10 px at a time). Rotate with ⟲ / ⟳ or drag the ◎ handle. Duplicate (mirrored) makes a mirror-image copy, which is handy for matching left and right sections.
Click Save draft often. The editor also keeps an undo history, so Undo / Redo (or Ctrl+Z / Ctrl+Y) work as you go.
Rows and seat numbering
With a section selected, each row in the left panel has:
- A row label (A, B, C…) and a seats count, so rows can have different lengths.
- Row labels on map: show row letters/numbers at Both ends of every row (the default), Start of row only, End of row only, or Hidden. Buyers see these same row labels on the seat picker map.
- A numbering scheme: L→R, sequential, R→L, sequential, or odd-only / even-only in either direction, for venues that number one side odd and the other even. Plus a start number.
- Renumber (closes gaps left by deleted seats), Select row, Add aisle, + row after, Remove row, and arrows to nudge the row.
Section-wide settings let you apply the same labels and numbering to every row at
once (Apply labels to all rows, Apply numbering to all rows). Seat label
format controls the printed seat name, for example {row}{num} gives "A7."
Change individual seats
- Click a seat to select it. Shift-click to add more seats, or turn on Select and drag a box around several.
- In the selection panel:
- Paint price level: click a level to move the seats into it.
- Kind: mark seats as a special type (see below).
- Note: e.g. "partial view."
- Reset to plain seat or Delete seat(s).
Arrow keys nudge the selected seats (Shift = 10 px). Press Esc to clear the selection.
| Kind | Sold to buyers? | Use it for |
|---|---|---|
| seat | Yes | A normal seat |
| ADA | Yes | Accessible seating (see below) |
| companion | Yes | The seat next to an ADA location, for a companion |
| obstructed | Yes | Partial-view seats. Add a Note to explain the obstruction |
| house | No | Seats you keep off sale, e.g. for the tech crew |
| kill | No | Seats that don't exist or can't be used |
Accessible seating
- Select the accessible location and the seat beside it (click, then Shift-click).
- Click Pair ADA + companion. The first seat becomes ADA and the second becomes its companion.
- With the ADA seat selected, tick Open floor space (no chair) if it's a wheelchair space rather than a fixed chair held for someone with accessibility needs. Wheelchair spaces are drawn as squares; accessible chairs stay round.
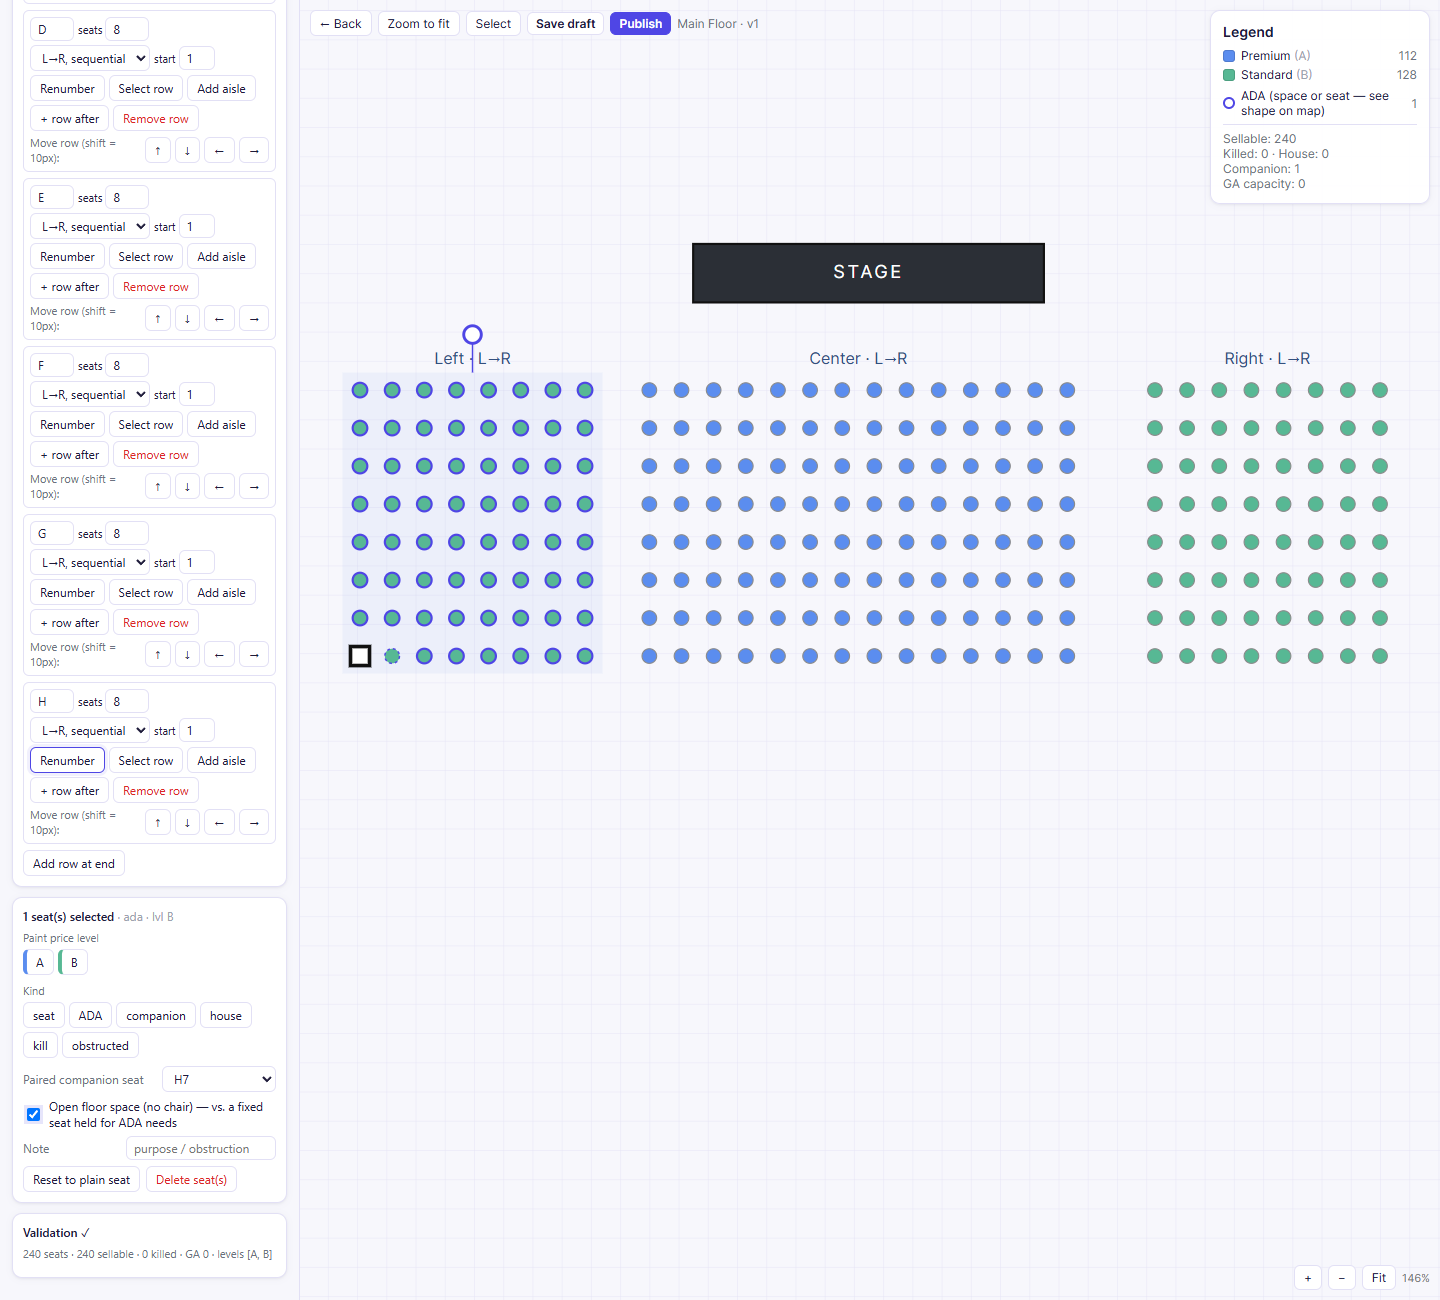
Buyers can switch on Accessible seating in the seat picker to find these seats quickly.
Validate and publish
The Validation box shows seat totals and any problems, such as seats with no price level, price levels with no seats, or ADA seats without a companion. Publish stays greyed out until there are no errors.
When the map is ready:
- Click Save draft.
- Click Publish. You're returned to the Venues tab, where the revision now shows published.
- Attach it to your event.
Related
- Venues: revisions, cloning, and diffs
- Blocking and holding seats: take seats off sale for one performance without editing the map
- Accessibility Resources: official guidance on accessible ticketing